Rapidly Exploring Random Tree (RRT), OpenRave, 7-DOF PR2 Robot Arm, C++
Abstract: There are a lot motion planning algorithms but few of them work well on a high-dimensional C-Space, until the RRT[^n] is out. In this post, we are going to implement a RRT algorithm in C++ and test it on a PR2 robot arm.
Introduction
First thing about this post is why am I writing it. I did this course project in my motion planning class from WPI. It is actually the third homework but a project; however, the due time of it was almost a month, so I think it should count as a project. As long as I stay in the robotics, I found myself start entering a field that has less cooked materials that means you can't just goole something online and learn about it with someone else's code. Only the first result page contains all useful information that from the search engine and it is this passioned me to write posts on what I did in this field to help people get into robotics without taking far ways.
Second thing about this post is there are bugs! I could say in order to let you think, I put bugs in the code; however the truth is I'm not good at coding and as a learner myself, issues just happen in my stuff. So please report the problem to me and I'm happy to fix them if they make sense. Please don't yield at me for misleading people with wrong ideas because giving or not is my side but taking or not is your side.
Ok long enough, let's get into the topic.
Supposed Results
This is my blogging style, I always let you know what you will take from this post. If you are unsure about your goal, please don't waste you time here.
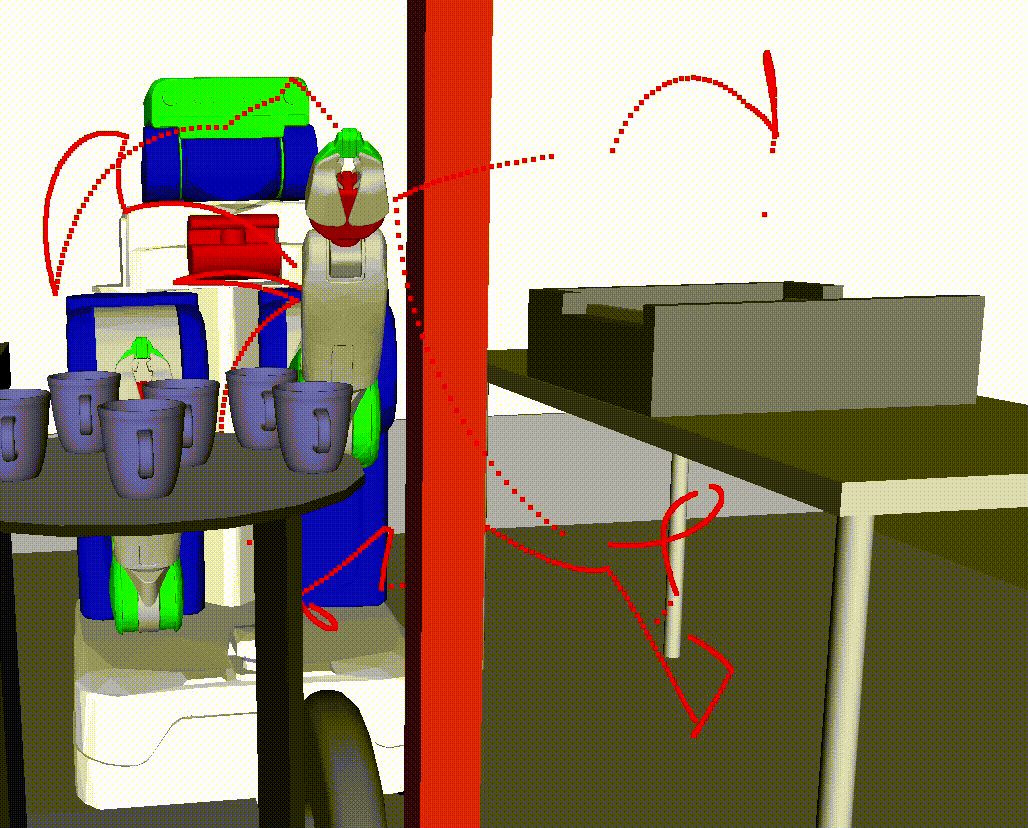
You can see from the video, red dots indicate the original path found by RRT no smoothing is done in the demo.
What is RRT ?
In order to implement the code, we should know how does RRT work first but don't worry about it. RRT is a very simple algorithm as long as you don't mess up with two key notations: C-Distance and Steps. We will talk about this later.
The real schemas of RRT:
- RRT is a sampling based algorithm which means the program randomly sample a point in C-Space and do something with it.
- RRT hold its sampled data in a tree structure (I wish I could have a demo in RRT when learning the Trees in my DS class).
- RRT extends the tree by sampling new C-Space points. Adding a new point to the nearest tree node will grow tree size by one.
- RRT detects if the goal point is add to the tree and backtrack the tree trunk when it is true.
- That is the RRT.
Real Trouble of Implementing RRT
After reading the schemas, you should raise two questions if you are really thinking about doing it.
-
Distance: How you define the nearest node? How to make comparisons with two C-Space points.
-
Types: How you should extend the tree? Just adding the new point? What if the random sampled point is too far, adding some intermediate points instead?
Extend Types
Let's solve the second one first. There are many ways to extend tree node, for example, one step cannon shooting method. Or the intermediate nodes method, which is called RRT-Connect this name was what I learnt from class but I found there are other places that RRT-Connect means bi-directionally connecting trees. Whatever, let's just call it in the first way.
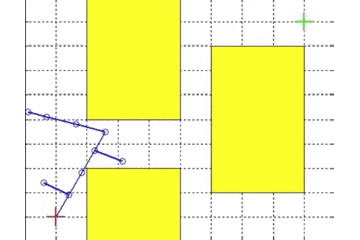
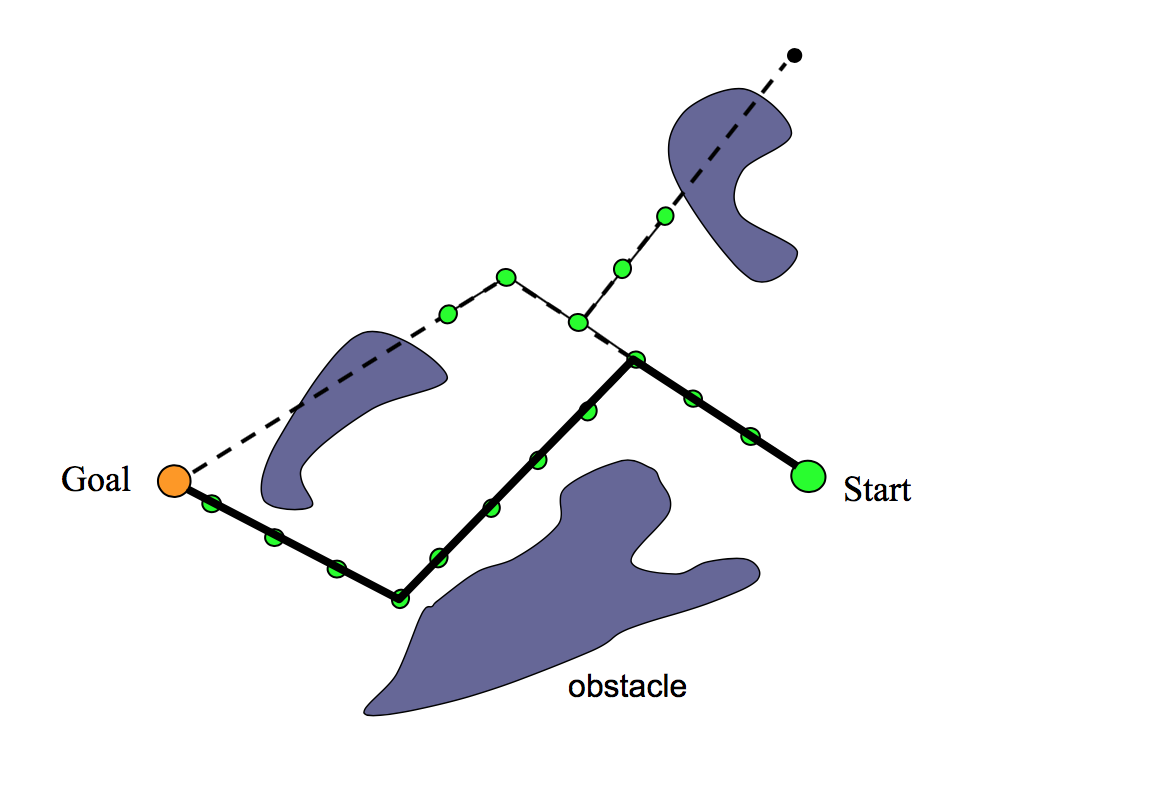
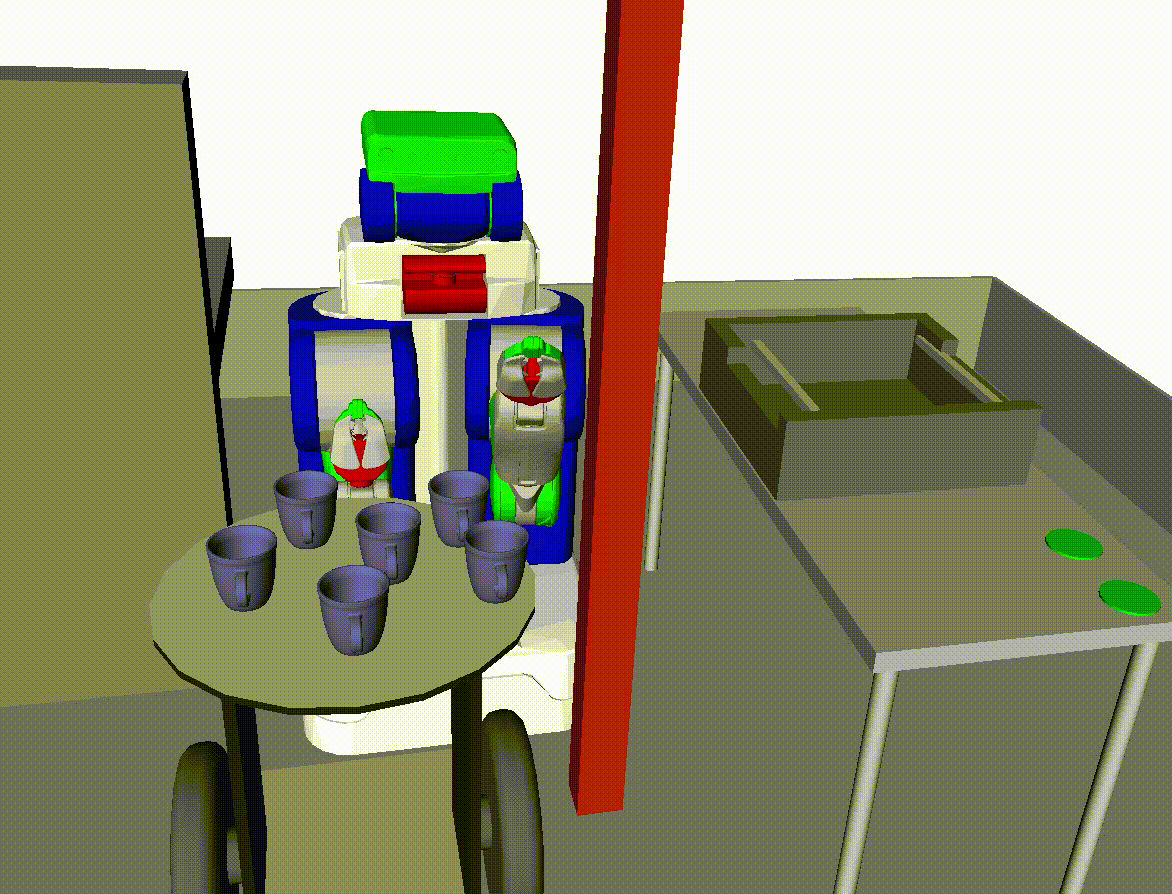
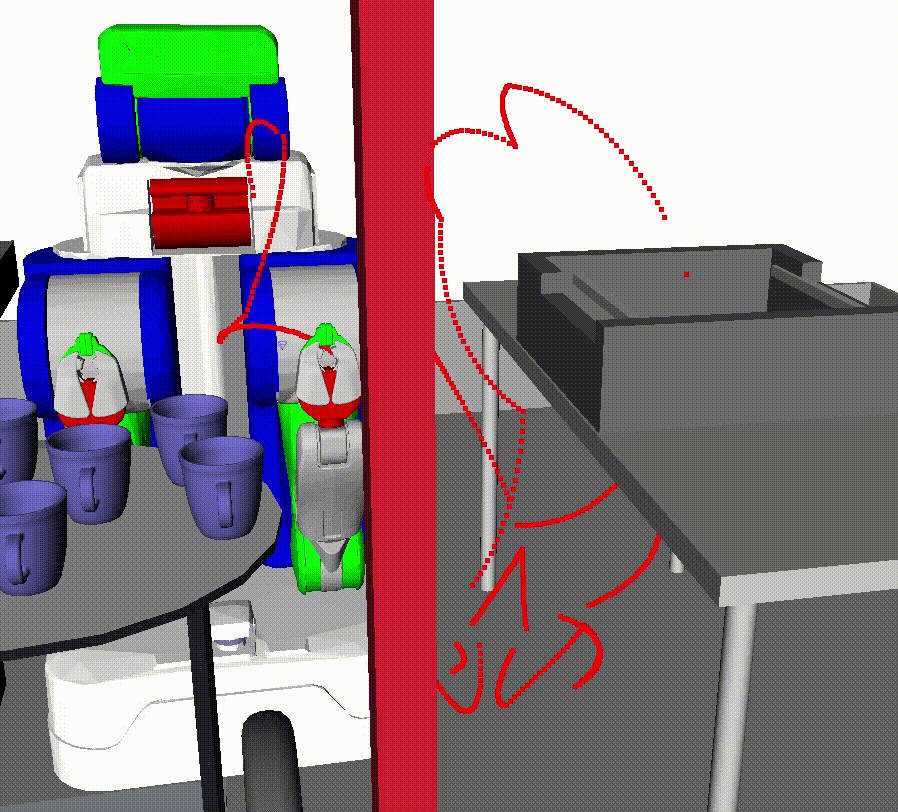
This is a goal biased RRT video[^n]. You can see that the tree adds intermediate nodes between the randomly sampled point and the nearest node to it on the tree. Notice that it is not very clear that the extending path will stop at the last node before it detect an obstacle is in the way. The picture[^n] below should give you a better idea of it.
It makes your program running in different speed that how you decide your step size. If you think this in depth, you may find this is not just making a fix step size value on each direction and combine them together, although this will work eventually, you are actually not walking on the straight direction to the goal. You can prove this easily but combining the fixed step size into one vector and that is the direction every time you extending the tree.
How should we decide the step size?
Making a vector towards the goal and taking a small portion of it every time.
This is where I got confused. The homework requirement says to get a step size of your own but finally I work it out. It is a poor name for the definition, instead of using Step Size, we should use the wold Step Scaler.
In other words, every time you try to get small step sizes you get a big one first, this one will be the single step vector gets you to the goal. This vector will have the correct direction towards to the goal and then you divid it by the magnitude to make a unit vector on that direction.
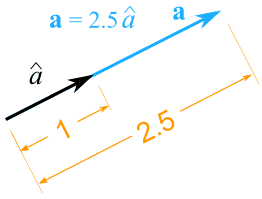
Finally, multiply your Step Scaler to the unit vector to get the real step vector for the extending. Why multiplying it? Because the unit vector is still big for a move, we don't want to move that much so that we won't jump over the obstacles.
Distance in C-Space
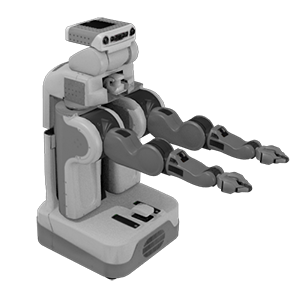
Distance, a word that we use a lot in motion planning. How to measure the points in C-Space and get their distance is so easy, just take the Euclidean of them in the high-dimensional space. However, it is not enough that we only doing this. We also need to weight them. Let look at the PR2 robot and make this part clear.
As we can see there are several joints on the arm. It is obvious that changing a same amount of joint angle on the shoulder joint will affect the End Effector having a bigger replacement than changing the joint value on the wrist. On the other hand, "distance" is a metric that how far a configuration point is from the goal configuration point. This means we have to give proper weights on the joints to let them reflect their importance on the effect of moving the End Effector. The weights should ONLY be used when calculating the distance. There's no other place that you will use the weights for determining step sizes. I made this mistake earlier on in my program so the distance results are coming out stupid.
Implementation
First let's prepare for the RRT with a tree and a tree node class. This is easy stuff so I give only header files out. I give a typedef configvector for holding the configurations.
typedef std::vector<OpenRAVE::dReal> configvector;

namespace PHE {
    class Node
    {
    public:
        Node(const configvector configuration);
        ~Node(){};

        bool setConfig(configvector configuration);
        configvector getConfig() const { return _configuration; }

        void assignParent(Node* parent);
        PHE::Node * getParent() const { return _parent;}

    private:
        configvector _configuration;
        PHE::Node * _parent;

    };
}
Below is the tree class header.
namespace PHE {

    class Tree
    {
    public:
        Tree(){};
        Tree(PHE::Node* root);
        ~Tree();

        void addNode(PHE::Node* node);
        PHE::Node* getNode(int index) const;
        size_t getTreeSize() const { return  _nodes.size(); };
        bool deleteNode(PHE::Node* node);
        bool deleteNode(int index);

        /*
         * returns the path of nodes from the root to the node
         * with a given index (including that node in the path)
         */
        bool getPathFromRoot(int index, pathvector &path);

    private:
        int treeSize;
        std::vector<PHE::Node*> _nodes;
    };
}
Constants Used
Notice that the codes given are not guaranteed completeness. Pasting too much code is a bad habit in blogging.
    enum STATUS {
        Blocked = -2,
        ForceQuit = -1,
        NoSolution = 0,
        ExtSucceed = 1,
        RandGoalReached = 2,
        FinalGoalReached = 3
    };

    enum COLOR {
        Red = 1,
        Green = 2,
        Blue = 3
    };

    struct Weight {
        const char * jotName;
        const double weight;
    };

    const Weight WEIGHTS[] = {
            {"l_shoulder_pan_joint", 6. },
            {"l_shoulder_lift_joint", 4. },
            // and so on
    };
The Basic Class
    class MyNewRRT : public ModuleBase
    {
    public:
        MyNewRRT(EnvironmentBasePtr penv, std::istream& ss);
        virtual ~MyNewRRT() {}
    private:
    	/* Control Params*/
        int sampleTimes;
        dReal goalBias;         // goalbias when sample random config
        dReal ONESTEPSIZE;
        // and so on

        /* OpenRave Parsma */
        EnvironmentBasePtr env;
        RobotBasePtr robot;
        std::vector<GraphHandlePtr> handler;

        /* Setup Parsma */
        configvector start;
        configvector goal;
        // and so on

        /* Temp variable, multitime calls in extend tree */
        PHE::Node* lastAddedNodePtr;
        PHE::Tree* treeA;
        // and so on

        /* Solution Param*/
        pathvector solution;

    };
Below are some methods implemented in the basic RRT class. They have been placed in order:
- Sample Random Config
- Calculate the scaled step size
- Find the nearest neighbor node on the tree to the sampled config
- Extend towards the random config until reached or blocked
- Redo from step 1 until goal is reached or time limit hit.
        /* RRT Important Phases Section */

        // sample a random configuration from all 7DOF within range [lower, uppper]
        // notice that this will only return a configuration NOT a node !
        // create node instance when EXTEND the tree
        configvector SampleRandConfig();

        // Calculate the intermediate step base on the current node config and random sampled goal config.
        // return true if the next step is not in collision, otherwise return false
        configvector AverageStepSize(configvector randConfig, configvector nearestConfig);

        // find nearest node on the tree to the given random configuration
        // return the index of the node on the tree
        int FindNearestNeighbor(PHE::Tree* queryTree, configvector randConfig);

        // Extend from the given mother node for a single tiny step
        // return based on Status
        int ExtendOneStep(PHE::Tree& queryTree, configvector& randConfig, PHE::Node* motherNodePtr, configvector& oneStepConfig);

        // Extend the tree to the randNode
        // Return based on Status
        int RRTConnect (PHE::Tree& queryTree, configvector& randConfig, PHE::Node* nearestNode);

        // Smoothing from the path stored in @solution
        bool Smooth(std::vector<configvector> &queeryPath);

        // excute the trajectory from the path stored in @solution
        void MakeAndExcuteTraj();
Now I'm giving out some method implementations.
How to do biased sampling is straightforward. Random a percentage between 0~99%, if it is under the threshold of the goal bias, which means you should return the biased goal. Otherwise you should rand a new percentage and use it to generate the random configuration. Notice this is a rejection sampling. It will reject all random sampled configurations that are in collision.
// throw a dice at the first, if the prob is in the goalbias zone(< bias value) then return the goal config
PHE::MyNewRRT::SampleRandConfig() {
    configvector randConfig = start;    //just for init this temp vector
    dReal rand = RandPercent();

    if ( rand < goalBias) {
        return goal;
    } else {
        // instead use rand conconfig in C-Space, make an rejectiong let it be in C-Free
        do {
            for (size_t i = 0; i < randConfig.size(); ++i) {
                randConfig[i] = (RandPercent() * (static_cast<double>(activeUpperLimits[i] - activeLowerLimits[i])) + activeLowerLimits[i]);
            }
        } while (IsInCollision(randConfig));

        return randConfig;
    }
}
Below is the unit vector scaled step maker.
// new version, using a single step size config, take the overall distance between current config and the random one,
// make an unit vector indicates the step scale of each direction. Multiply stepsize on each direction to make the
// averaged step size small enough for extending. Return the averaged step sizes config vector
configvector PHE::MyNewRRT::AverageStepSize(configvector randConfig, configvector nearestConfig) {
    configvector distVector = randConfig;
    configvector unitVector = randConfig;
    configvector averagedStepConfig = start; // for init
    // computes the configuration difference q1-q2 and stores it in q1.
    // Takes into account joint limits and circular joints
    robot->SubtractActiveDOFValues(distVector, nearestConfig);
    dReal distanceMeg = CalVectorMag(distVector);

    for (size_t i = 0; i < start.size(); ++i) {
        unitVector[i] = (distVector[i] / distanceMeg);
    }

    for (size_t i = 0; i < start.size(); ++i) {
        averagedStepConfig[i] = unitVector[i] * ONESTEPSIZE;
    }

    return averagedStepConfig;
}
Below is the important part of the RRT-extend with a single step. The RRT-Connect is in general keep calling this util some status were returned. Notice A Common Mistake here is extending from the wrong mother node. You need to think about a way that remembers the last node you added and use it as the mother node for next extending. The special case is for the very first time, you should use the nearest neighbor node as the mother node.
// Extend one step, using the step configuration given
int PHE::MyNewRRT::ExtendOneStep(PHE::Tree& queryTree, configvector& randConfig, PHE::Node* thisMotherPtr,
     configvector& oneStepConfig) {

    configvector nextNodeConfig = oneStepConfig;

    for (size_t i = 0; i < oneStepConfig.size(); ++i) {
        nextNodeConfig[i] += thisMotherPtr->getConfig()[i];
    }

    if (IsInCollision(nextNodeConfig)) {
        return Blocked;

    } else {

        if (IsVeryClose(goal, nextNodeConfig)) {
            // do something
            return FinalGoalReached;

        } else if (IsVeryClose(randConfig, nextNodeConfig)) {
            // do something
            return RandGoalReached;

        } else {
            IsVeryClose(thisMotherPtr->getConfig(), nextNodeConfig);
            // do something
            return ExtSucceed;

        }
    }
}
Here are some handy util methods. I give them out just for your reference. Notice the OpenRave function SubtractActiveDOFValues() will return you a difference vector that already taking care of the different joint scale. For example, some joints have a range of -3.0 ~ 3.0 but some else are -10000 ~ 10000. The results returned from this function will give you something like (1.1, 0.9, 1.5 ...) which is very decent.
/* Utils Section*/

// use getline() to handle the input stream and parse the parameters
// return a vector with arguments in ordered.
std::vector<std::string> PHE::MyNewRRT::ParseInput(std::ostream& sout, std::istream &sinput) {
    char arguments[BUFSIZE];
    std::vector<std::string> vstrings;
    try{
        while(sinput.getline(arguments, BUFSIZE)) {
            OpenRAVE::utils::TokenizeString(arguments, ", \n\t", vstrings);
        };
    }catch(std::ifstream::failure e){
        std::cerr << "Exception happened: " << e.what() << "\n";
    };

    sout << "Receive sinput: " ;
    for (size_t i = 0; i < vstrings.size(); ++i) {
        sout << vstrings[i] << ' ' ;
    }
    sout << std::endl;

    return vstrings;
}

// single version to get magnitude of a vector
dReal PHE::MyNewRRT::CalVectorMag(const configvector& queryVector) {
    configvector tempConfig = queryVector;

    dReal mag = 0.0;

    for (size_t i = 0; i < tempConfig.size(); ++i) {
        mag += std::pow(tempConfig[i], 2.0);
    }
    mag = std::sqrt(mag);
    return mag;
}

// calculate the distance between to configurations
dReal PHE::MyNewRRT::CalDistance(const configvector& fromConfigA, const configvector& toConfigB) {

    configvector tempConfig = fromConfigA;

    // fromA = FromA - toB
    // get the different values, means the distance vector
    robot->SubtractActiveDOFValues(tempConfig, toConfigB);
    dReal mag = 0.0;
    for (size_t i = 0; i < tempConfig.size(); ++i) {
        mag += std::pow(tempConfig[i] * (WEIGHTS[i].weight/TotalWeights()), 2.0);
    }

    return std::sqrt(mag);
}

// Get the endeffector position
std::vector<float> PHE::MyNewRRT::GetEEPosition(configvector& config) {
    RobotBase::RobotStateSaver save(robot);
    robot->SetActiveDOFValues(config);
    robot->SetActiveManipulator("leftarm");
    RobotBase::ManipulatorPtr mani;
    mani = robot->GetActiveManipulator();
    RaveVector<float> point = mani->GetEndEffectorTransform().trans;

    std::vector<float> endEffector;
    endEffector.push_back(point.x);
    endEffector.push_back(point.y);
    endEffector.push_back(point.z);

    return endEffector;
}

// Draw a point at the end effector position
void PHE::MyNewRRT::DrawEndEffector(configvector& config, int color) {

    std::vector<float> endEffector = GetEEPosition(config);

    float red[4] = {1,0,0,1};
    float green[4] = {0,1,0,1};
    float blue[4] = {0,0,1,1};

    if(color == Red)
        handler.push_back(env->plot3(&endEffector[0],1,1,5,red,0,true));
    else if (color == Green)
        handler.push_back(env->plot3(&endEffector[0],1,1,4,green,0,true));
    else if (color == Blue)
        handler.push_back(env->plot3(&endEffector[0],1,1,4,blue,0,true));
    else {
        RAVELOG_INFO("Unknown Drawing Color\n");
        abort();
    }
}
The last thing is sending commands and don't forget to unit test your class member functions while implementing your code. Then build the code and you should able to call your plugin in OpenRave. If you don't know how to do it, [see the tutorial page here.](openrave plugins)
PHE::MyNewRRT::MyNewRRT(EnvironmentBasePtr penv, std::istream& ss) : ModuleBase(penv) {
    RegisterCommand("SetStartConfig",boost::bind(&MyNewRRT::SetStartConfig,this,_1,_2),
                    "Set the start configuration");
    RegisterCommand("SetGoalConfig",boost::bind(&MyNewRRT::SetGoalConfig,this,_1,_2),
                    "Set the goal configuration");
    RegisterCommand("Initialize",boost::bind(&MyNewRRT::Initialize,this,_1,_2),
                    "This Command will gather needed parameters for RRT");
    RegisterCommand("RunMyRRT",boost::bind(&MyNewRRT::RunMyRRT,this,_1,_2),
                    "Run this to get an RRT solution");
    RegisterCommand("TestCreateNode",boost::bind(&MyNewRRT::TestCreateNode,this,_1,_2),
                    "Test Creating a node.");
    RegisterCommand("TestCreateTree",boost::bind(&MyNewRRT::TestCreateTree,this,_1,_2),
                    "Test Creating a tree.");
    RegisterCommand("TestInitialize",boost::bind(&MyNewRRT::TestInitialize,this,_1,_2),
                    "Test Initialize.");
    RegisterCommand("TestSmallFuncs",boost::bind(&MyNewRRT::TestSmallFuncs,this,_1,_2),
                    "Test Small Functions.");

}
Just in case you are new to CMake(like myself), I've attached my CMakeList.txt here.
cmake_minimum_required (VERSION 2.6.0)
project(MyNewRRT)
find_package(OpenRAVE 0.9 REQUIRED)

if( CMAKE_COMPILER_IS_GNUCC OR CMAKE_COMPILER_IS_GNUCXX )
  add_definitions("-fno-strict-aliasing -Wall")
endif( CMAKE_COMPILER_IS_GNUCC OR CMAKE_COMPILER_IS_GNUCXX )

# optional in case boost is used
find_package(Boost ${OpenRAVE_Boost_VERSION} EXACT)

include_directories(${OpenRAVE_INCLUDE_DIRS} ${Boost_INCLUDE_DIRS})
link_directories(${OpenRAVE_LIBRARY_DIRS} ${Boost_LIBRARY_DIRS})
add_library(MyNewRRT SHARED MyNewRRT.cpp MyNewRRT.h Node.cpp Node.h Tree.cpp Tree.h)
set_target_properties(MyNewRRT PROPERTIES COMPILE_FLAGS "${OpenRAVE_CXX_FLAGS}" LINK_FLAGS "${OpenRAVE_LINK_FLAGS}")
target_link_libraries(MyNewRRT ${OpenRAVE_LIBRARIES})
install(TARGETS MyNewRRT DESTINATION .)
Conclusion
In this post, we've learnt how to make a OpenRave plugin in C++ and called from python. This will give you a very good experience to understand how fast the C++ is that the python and how convenient the python is that the C++.
Hope you still remember some key points in how to compare the distance, how to make step size and how to grow the tree from last added node.
The above video is showing the progress of RRT tree expanding with goal bias of 50% and step scaler of 0.02, close range threshold of 0.3.
The end effector points are plotted out.
- Green: With a collision free configuration.
- Blue: With a colliding configuration when extending the tree.
- Red: The trajectory found to the goal.
Notice: The smoothing part is not given in the post but it works after the original trajectory is found. I use a shortcut smoothing method. The green dots are the smoothed path after original path is found in the demo below.
[1]: LaValle, Steven M. (October 1998). "Rapidly-exploring random trees: A new tool for path planning". Technical Report (Computer Science Department, Iowa State University) (TR 98-11).
[3]: Dmitry Berenson's motion planning class 2016 in Sample2.ppt, page 22.